
Product Description
(This module is included in the System B)
The S315 is a mini sampler and VCO module that offers the most essential features plus a bit more. With capabilities like record, overdub, crop, reverse, loop, de-click, cross fade, load and save/export and more. The module can load wav, mp3, ogg and aiff formats and can save/export to wav. All with powerful dedicated anti-aliasing controls.
The module can work in one of two modes. Sampler mode or VCO mode. Sampler mode is turned ON by moving the Len (length) knob while VCO mode is turned ON by either clicking on the Up/Down button near the Cycles digital LED display or clicking on the display it self. The two red LEDs under the Len and Cycles display indicate which mode is active. Only one of the modes can be active at once.
In all modes, the S315 can hold only one sample. Be it large or small. If you want to trigger/play multiple samples, use multiple S315 modules. You can for example, load a large sample loop into the S315 and then chop it into multiple samples by saving/exporting many parts of it as wav files. Then load those files into multiple S315 modules.
When saving presets. Sample data will be automatically saved in the preset file. No need to manually save samples to wav files.
Sampler mode:
In this mode the module responds to Gate In triggers/gates and plays, loops and replays samples of any size*. The Loop/Gate/One Shot switch determines what to do while the Gate In is in high voltage and should be self explanatory once you try them. The Restart switch dictates whether or not the sample restarts play back from the Start position every time a new gate comes in (ie. Gate In moves from low to high voltage). When switched off, sample play back will continue where it left the last time Gate In moved from high to low. The Start knob determines the start position to play from. The Fine knob works as fine tune for the Start knob. The Fine knob also doubles as an attenuator for the Start CV when a cable in connected. The Len knob determines the length of the sample to be played. Using both the Start and Len you can play any region of the loaded/recorded sample. Notice that Len knob is not linear, it’s designed to give you finer control in low settings which makes it easier to dial small waveforms. This comes with none linearity side effects. For example, at half position, the length is not half of the sample. The Loop knob determines the loop point at which the sample will start looping when playback reaches the end of the selected region. Notice that the loop point exact position is always relative to the currently selected Start and Len. The CV in patch point (Not the Tune CV) can be used to tune the S315 using 0.1v/oct voltages just like an oscillator. The Tune knob can tune the S315 manually. When Tune CV is connected to a cable, the Tune knob becomes an attenuator for it. This Tune CV tuning is NOT exponential. Meaning that it’s not meant to be used with 0.1v/oct but rather with modulation sources. It expects -1V to +1V. The note button ![]() is used to capture the root (middle) note voltage at which the sample should be played at its original tuning. When pressed, the current voltage present at CV in is captured. This information will be saved when the sample is exported/saved.
is used to capture the root (middle) note voltage at which the sample should be played at its original tuning. When pressed, the current voltage present at CV in is captured. This information will be saved when the sample is exported/saved.
Note: The ![]() button can be tricky to understand when polyphony is used. Because there are multiple note voltages present at different voices. This button will only capture the FIRST voice voltage and apply it to all voices (otherwise playing would produce chaos). This means that you might need to send several notes until the first voice note voltage is changed and then press this button.
button can be tricky to understand when polyphony is used. Because there are multiple note voltages present at different voices. This button will only capture the FIRST voice voltage and apply it to all voices (otherwise playing would produce chaos). This means that you might need to send several notes until the first voice note voltage is changed and then press this button.
The Loop Xfade knob controls the amount (length) of cross fading between the start and end of the currently selected region. You can use this for example to create sustained pads or just to smooth out clicking when looping. At maximum, the length of the cross fade will be half the total length of the selected region. Notice here that because of how cross fades work, the total length the of selected region will be shortened as the Loop Xfade is increased. To prevent this from happening, click the red LED below the Loop Xfade knob (to lit). This internally extends the selected region’s total length to compensate for the shortening. But for this to work, the Len has to be considerably less than max. Otherwise there would not be enough sample information to extend by. This red LED also has another side effect. It forces the minimum cross fade region to be NOT less than 2 samples in length. Notice that the Loop Xfade knob is not designed for automation as there is little to no use of that.
The Declick knob helps smooth out abrupt changes that cause clicking when playback starts or ends. It applies a smoothing envelope when a gate is received or gone. Notice that this feature doesn’t affect clicks in the sample it self (as these can be useful) or clicks due to looping (use Xfade for that). It only declicks as fade in and fade out when Gate In changes. The Record ![]() button records sample data from the In patch point replacing any existing sample data in memory. If Overdub button has been pressed before recording, recording will mix with the existing sample data instead of replacing it. Also, the recording will start from the Start position, this way you can choose where to overdub. The T (Trim) button can be used to remove any silence from the beginning and end of recorded (or loaded) sample data. The Thresh knob is used in conjunction with the T button to determine the level (volume) that will be considered as silence. The higher, the more you trim.
button records sample data from the In patch point replacing any existing sample data in memory. If Overdub button has been pressed before recording, recording will mix with the existing sample data instead of replacing it. Also, the recording will start from the Start position, this way you can choose where to overdub. The T (Trim) button can be used to remove any silence from the beginning and end of recorded (or loaded) sample data. The Thresh knob is used in conjunction with the T button to determine the level (volume) that will be considered as silence. The higher, the more you trim.
Anti-Aliasing in sampler mode
The Anti-Alias knob has 11 levels (From 0 to 10). When at level 0 (Minimum) anti-aliasing is turned OFF. Levels 1 to 10 are ON. To reduce the CPU usage, a big chunk of the anti-aliasing process is precalculated and is saved to memory. While the precalculation is being done the busy LED will keep blinking. Once the blinking turns permanently off, this means precalculation has finished and the module is ready to play in anti-aliased fashion. Notice that some amount of calculation still has to be done live so there is still some CPU usage incurred. The following are details for the different levels:
Level 0: No anti-aliasing
Level 1: 2X Oversampling with 32 taps, 7 Octaves.
Level 2: 4X Oversampling with 64 taps, 7 Octaves.
Level 3: 4X Oversampling with 96 taps, 7 Octaves.
Level 4: 4X Oversampling with 128 taps, 7 Octaves.
Level 5: 8X Oversampling with 256 taps, 7 Octaves.
Level 6: 16X Oversampling with 512 taps, 7 Octaves.
Level 7: 32X Oversampling with 1024 taps, 7 Octaves
Level 8: 64X Oversampling with 2048 taps, 8 Octaves
Level 9: 128X Oversampling with 4096 taps, 9 Octaves
Level 10: 256X Oversampling with 8192 taps, 10 Octaves
The octave count above describes how many octaves above the root note the precalculation is done for. (below root notes don’t consume much). We expect that in 90% of cases, you’d not need more than 4X oversampling. Levels 2,3 and 4 are dedicated to 4X with the difference being the number of taps which dictate how sharp the roll-off/cut is at 20Khz. The higher the taps, the sharper the roll-off****. The Min-P/S/Lin-P switch dictates which type of filter is used for the anti-aliasing. Lin-P is Linear Phase filtering which is the most faithful filter in terms of preserving the sample phase differences in it’s harmonic content. Though it has a side effect of introducing a constant delay. (The delay is very minor here since we are oversampling). The Min-P is Minimum Phase filtering which is meant to minimize the delay but is less faithful in preserving the phase differences in the harmonic content. The S mode is for Spectral Image Removal which is meant for down pitching. Have a look at this pitched down sawtooth spectrum graph:
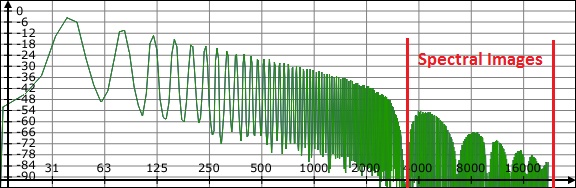
This type of pitch down spectral image aliasing is different than the usual reflective aliasing you’d get when you pitch up a sound. First, it’s harmonious with the original sound so it doesn’t sound out of tune like pitch up aliasing. Second, it doesn’t fluctuate rapidly so there is no nasty zipper effect. In-fact, in many cases, this type of aliasing can be musically preferred!!. But if it’s undesired to you, the S mode can be used to remove those spectral images. This mode will consume much more memory and precalculation time. Notice here if you like to use Lin-P with S then switch to Lin-P first then immediately switch to S. Likewise, if you like to use Min-P with S, switch to Min-P first then immediately switch to S.
VCO mode:
In this mode the S315 is used to freeze a very small region from a sample and anti-alias it to create a fully playable waveform. At first glance this might sound like its similar to wavetable oscillators. But its actually not. Wavetables usually morph between fixed size waveforms. The S315 can handle arbitrary sized waveforms and has no morphing. It simply acts as general purpose waveform generator and player.
Waveform playback is always ON regardless of the Gate In. Set the Start to where you want and choose the number of Cycles you want for the waveform. The module will immediately analyse the sample data and determine the waveform length and generate an anti aliased version of it. You can now change the Start as you wish to scan the original sample at different location. Once you choose a location, wait briefly and module will start regenerating an anti-aliased waveform from that selected location. Another way to choose waveform length, is to click on the Cycles display itself. This will take the Len knob length (instead of the number of cycles) and use it to generate the waveform. The digital display will show “AR” indicating “Arbitrary” waveform length. Notice changing the Start will also show “AR” (although the length stays the same) because the number of cycles is no longer guaranteed the same when Start is changed.
The Loop, Loop Xfade, Declick, Loop/Gate/One Shot, and Restart features simply don’t work in VCO mode since there is no need for them.
Anti-Aliasing in VCO mode
Anti-Aliasing in this mode works similar to the features described above but with the following differences:
1.The precalculation has to occur not just once, but every time you change the Start, Cycles or click the Cycles display or even change the Anti-Alias knob or Min-P/S/Lin-P switch. Though the pre-calculation will be brief. It should not take more than a few seconds***. This also means that you can’t perform/automate/modulate the Start and Start CV in this mode.
2. The anti-aliasing levels are a bit different where the first two levels are completely pre-calculated without any live oversampling. This will give excellent quality with almost no CPU hit. But the down side is that the pre-calculation will take longer (In levels 1 and 2). Here are the details:
Level 0: No anti-aliasing
Level 1: 2X full pre-calculation. No live oversampling. (S-Mode recommended for pitch up)
Level 2: 4X full pre-calculation. No live oversampling. (S-Mode recommended for pitch up)
Level 3: 2X Oversampling with 32 taps.
Level 4: 4X Oversampling with 64 taps.
Level 5: 4X Oversampling with 96 taps.
Level 6: 4X Oversampling with 128 taps.
Level 7: 8X Oversampling with 256 taps.
Level 8: 16X Oversampling with 512 taps.
Level 9: 32X Oversampling with 1024 taps.
Level 10: 64X Oversampling with 2048 taps.
We recommend using S-mode with levels 1 and 2 for pitch up. Although it’s not necessary in many cases. But ofcourse the final verdict is your ears. Notice here that if the waveform is short (<441 samples) the full pre-calculation will be done in all levels because it really takes a short time to pre-calculate.
3.The exclamation button ![]() provides a neat method that completely avoids aliasing by using waveform trickery. When this button is pressed, anti-aliasing is completely turned OFF and you’d get no aliasing at all !!. This might sound like witch craft. But its possible. However, there is a catch. The pitch will NOT be accurate as you go higher, specially above 1Khz. Still this method is surprisingly playable in low and mid range. You can improve the pitch accuracy by using 2X SoloRack’s oversampling. This method is also ideal for percussive sounds where pitch accuracy doesn’t matter.
provides a neat method that completely avoids aliasing by using waveform trickery. When this button is pressed, anti-aliasing is completely turned OFF and you’d get no aliasing at all !!. This might sound like witch craft. But its possible. However, there is a catch. The pitch will NOT be accurate as you go higher, specially above 1Khz. Still this method is surprisingly playable in low and mid range. You can improve the pitch accuracy by using 2X SoloRack’s oversampling. This method is also ideal for percussive sounds where pitch accuracy doesn’t matter.
Other Features
The C (Crop) button will remove anything before and after the selected region. R (Reverse) button will reverse the selected region. The L (Load) button allows you to load samples from wav, mp3.. etc. files. The Right/Mix/Left determines which channel should be loaded from the file. If Mix is chosen, the two channels will be mixed and loaded. Notice here that if Overdub was pressed before loading the file, the sample data will be overdubbed/mixed with the currently available sample in memory starting from the Start position. The S (Save) button can be used to save the selected region as a wav file. This save feature is best suited for transferring samples between SoloRack presets or simply for later usage. The save feature will retain Xfade, Declick, Loop/Gate/One Shot, Restart and exclamation button settings**. The E (Export) button is a bit different than the S button. It’s more suited for loading in other 3rd party samplers or DAWs. It doesn’t save any knob/switch settings. The export allows choosing the bit depth and sample rate of the exported sample. The export can also optionally apply the Xfade and Declick to the sample before exporting it. This is different than how the S (save) feature works as the S saves the knob/switch settings in the wav file without applying their effect to the sample data. Note here that exporting Declick may not always be possible. For example, if the sample is looped, the fade-out of the declick can’t be exported. Also the fade-in can’t be exported if the loop point is near or at the start position.
Sample Changing Controls
By now, you might be wondering about this. The following are the only controls that actually modify/change the sample stored in memory. T (Trim), C (Crop), R (Reverse), L (Load) and Record button. All other controls including anti-aliasing controls do NOT change the actual sample in memory. They only affect how the sample is played.
Using the S315 as a CV recorder/player
Yes, you can do that!!, but you have to disable anti-aliasing for this to work. Otherwise, DC and slow voltage movements will be eaten. Other than that, everything else will work almost the same. You can speed up or slow down any CV modulation with the Tune knob. Save as wav files.
Using an audio sample as an LFO
You can slow down any sample to a very low frequency as follows.
1. Connect negative voltage to the CV input. You can do this using the S903 and dialing a negative voltage until the rate become very low. Say -0.6V or lower.
2. You can now fine tune the speed of the LFO further using Tune knob.
Using sampler mode as a VCO
Although VCO mode has the advantage of being low on CPU as well as very low aliasing. Still, because the waveform is freezed, the Start knob and Start CV can’t be used for aliasing free automation/modulation in VCO mode. If you want to do this, put the module in sampler mode, give it a sustained gate and dial a very low Len until it becomes like an oscillator. Now you can smoothly modulate Start and use Start CV to scan through the sample for more movement. All controls work live after the initial precalculations. But also, because of this the sound will be more pron to aliasing. Mainly because of the loop point discontinuity. Here are a few tips to help lower or eliminate the aliasing in sampler mode.
1. Make sure the red LED under Loop Xfade knob is lit. If you still hear aliasing, increase the Loop Xfade knob amount until there is no audible aliasing. This is the best method to eliminate aliasing without taking any CPU hit. The Loop Xfade will work as a smoother that will smooth out loop point discontinuity which is responsible for most of the aliasing.
2. You can use the exclamation button ![]() feature which is aliasing free and CPU friendly. But with the pitch quantization and inaccuracy side effect. You can put the Anti-Alias at level 0 if you use this feature.
feature which is aliasing free and CPU friendly. But with the pitch quantization and inaccuracy side effect. You can put the Anti-Alias at level 0 if you use this feature.
3. You can increase the Anti-Alias level to whatever is desirable for you. There is no side effect here. But you’d consume more CPU
Technical Details
The maximum sample size that can be recorded/loaded is about 1Gb. Anti-Aliasing in sampler mode consumes an extra memory about twice as much as the sample size. Using S mode will use upto 5 times as much as the sample size. VCO mode memory consumption depends on the chosen length of the waveform. So say if you choose a 5 cycles wave form, say this would typicaly consume about 1000 samples. 1000 X 4 bytes X 7 octaves = 28000 Bytes = 28KB. Which is nothing really. So anti aliasing sampler mode is the biggest memory consumer since the whole sample recorded/loaded is anti aliased, not just a tiny waveform.
All this data is kept in memory. For this, it is recommended that you keep well bellow the 1Gb sample limit to avoid crashes. A 64bit platform (plugin/DAW) is much less likely to have crashes than a 32bit platform. However, in both cases, too much memory consumption can lead to memory being placed on disk by the OS (virtual memory). If this happens, you may start to notice high CPU spikes and clicks and pops when changing the Start, Loop and Len knobs. Setting Anti-Alias to level 0, will free up all anti-aliasing memory. Upping the level again would require re-precalculations and storage in memory.
Recording while SoloRack is oversampling is the same as recording in a higher sampling rate. For example, if your DAW is working at 44.1Khz and your using 4X oversampling in SoloRack (Not the Anti-Alias Knob), the recorded sample will have a sample rate of 44.1 X 4 = 176.4Khz. This will obviously consume more memory (4 times). And you can easily see how this can get out of hand as you increase the oversampling further. The whole 1Gb limit can be consumed in few minutes when recording with higher sampling rates. Recording in higher rate allows you to record super sonic sounds. This can become interesting if you pitch down to bring them to audible range. When saved (S button) the wav file will retain this higher sample rate. When exported (E button), You can choose a sample rate that you want via the menu that appears. Though the original sample rate will be added/marked with a check mark in that menu for you to know. Notice that saving at a different sampling rates would require resampling, which is not a lossless process.
While precalculation is being done (busy led blinking). The module will automatically and temporarily allow you to work in aliasing mode. VCO mode is generally more CPU efficient than sampler mode.
*Sample size is limited to a large 1Gb. But it’s preferable to stay well bellow this limit because much more memory is actually required for anti-aliasing. This memory requirement gets larger as sample size get larger.
** SoloRack has it’s own wav file extensions that save SoloRack specific information such as Xfade and Declick amount etc… as well as precise (fractional) loop point position.
*** If the precalculation in VCO mode takes more than a second or two, then you probably chosen a very long waveform length using the Len knob then clicked on the Cycles display. VCO mode is obviously not meant for very long waveforms.
**** The sharpness of the roll-off decreases as the oversampling increases, thats why the taps have to be increased when increasing the oversampling. “Taps” here is equivalent to what others samplers or DAWs may call “Point”. You may have seen something like “64 point sinc” or “256 point sinc”. It’s the same here. Just a different name.
Reviews
There are no reviews yet.