
Product Description
(This module is included in the System B)
Sending perfect pitch CV from software to hardware and vise versa can be a very hard task to accurately setup manually. As the audio/CV path may offset, attenuate or amplify the voltages which will give inaccurate pitch. Furthermore the audio/CV path may contain analog none linearities. The purpose of the SE06 is to automatically probe the hardware and calibrate it self to make sending pitch to/from SoloRack much easier and quicker.
Hardware requirments
1. DC coupled outputs are required to be able send pitch using the SA12. Please read the details here: http://www.solostuff.net/product/sa12-audiocv-to-daw/
2. DC coupled inputs are required to be able receive pitch using the SA11. Please read the details here: http://www.solostuff.net/product/sa11-audiocv-from-daw/
In our example here, we are using the ES-8 module to act as our audio interface.
3. For the tuning process to succeed. At least one hardware VCO is needed that can track 1v/octave. And can output at least one simple waveform, like sin, triangle, square or sawtooth, The VCO does NOT have to be in Eurorack format. Once the tuning is done, any other VCO with complex waveforms can be pitched and played correctly.
4. A hardware LFO can be handy some times for trouble shooting.
Choosing and detecting middle C
The SE06 can calibrate it self to tune a range of 8 octaves centered at middle C. The default middle C in SoloRack is at MIDI C4 which is at 261.6Hz. This frequency should correspond to 0 volts (except in the +V mode, shown bellow). There are three modes of operation chosen by the switch in SE06.
–261.6Hz Mode: This will make the SE06 assume that your chosen middle C is 261.6Hz. It is recommended that you manually tune your hardware VCO to that frequency (while CV in is disconnected) to avoid confusing offsets after tuning.
-VCO Mode: This will allow you to set your own middle C frequency on your hardware VCO and let the SE06 detect it. Please do the following:
1. Connect the hardware VCO output of one of the simple waveforms (sin, triangle, square, sawtooth) to an input port on your audio interface. This port should be routed in your DAW to lead to either the SA11 patch points or SA01 patch points. Then connect that patch point to the VCO in on the SE06.
2. Disconnect all other cables from your hardware VCO including the CV in.
3. In SE06, make sure the Note Out (the grayed one) is NOT connected to anything.
4. Manually set the hardware VCO tune knob to your desired middle C frequency.
5. Click/press the Tune out button on the SE06. Frequency detection will start. The red led will blink briefly. When it turns off, you know that the SE06 has detected and stored your chosen frequency in its memory.
+V Mode: This mode is similar to VCO mode but assumes that 0V is associated with the LOWEST base frequency, NOT middle C. This is useful for many hardware sequencers and keyboards that cannot send negative (bipolar) voltages. In this mode, tuning will happen only above the lowest frequency with the same 8 octaves range. Frequency detection is done exactly like in VCO mode but you have to tune your VCO to the LOWEST frequency you desire, not middle C.
All three modes take effect only after tuning has been done.
Step 1 (Tuning Out)
After this step is done, SoloRack will be able to send 1V/oct pitch CV to your hardware oscillators. All the following description corresponds to the upper part of the SE06 panel, labeled Step 1.
1. Connect the Note Out on the SE06 to a patch point on the SA12 that leads to a hardware port that you want to connect your hardware VCO to.
2. Connect your hardware VCO 1v/oct pitch CV in to the port mentioned above.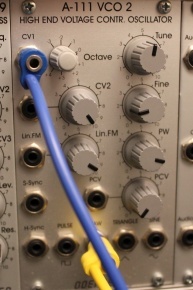
3. Connect the hardware VCO output of one of the simple waveforms (sin, triangle, square, sawtooth) to an input port on your audio interface. This port should be routed in your DAW to lead to either the SA11 patch points or SA01 patch points. Then connect that patch point to the VCO in on the SE06.
4. Click/press the Tune out button on the SE06 to start the tuning process. The tuning should start and the red (tuning) led should start blinking. This will take about 20 to 30 seconds. If the tuning succeeds, the red led should turn off and the blue (tuned) led will turn on. If the tuning fails, both leds will turn off.
Assuming the tuning above succeeds, connect the Note in patch point to a MIDI-to-CV module or a sequencer and start playing your hardware from SoloRack!!. You can remove VCO in connection if you like. Now you can use any hardware VCO by connecting it to the SAME cable (pitch CV in path) that you used for the tuning. Notice, that the CV path from Note out to your hardware until it reaches your hardware VCO pitch CV in cannot be altered, otherwise the tuning will be lost!!. Any software or hardware faders or components throughout the pitch CV path should remain exactly the same.
Step 2 (Tuning In)
Step 2 can NOT be done without first doing step 1. The following description corresponds to the lower part of the SE06 panel, labeled “Step 2”, except for Note Out (the grayed one), we will be using that too.
1. Leave the Note Out (the grayed one) connection that was made in Step 1 as it is.
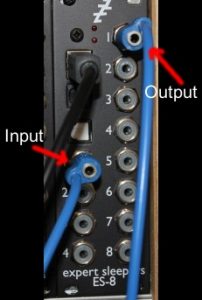
2. Make a feedback connection. That is, take the same pitch CV cable that was going to your hardware VCO pitch CV in and connect it back to one of your audio interface inputs!!. That input should be routed in your DAW to reach the SA11 (or SA01) in SoloRack. This may sound strange, but this is how the SE06 grantees that the pitch CV coming from your hardware is 1v/oct at the calibration voltage. Check the picture shown. We use an ES-8 here. But any other alternative audio interface can suffice.
3. In SoloRack, connect the Note In in the SE06 to the patch point in the SA11 (or SA01) that corresponds to the input that you just connected above. The big picture here is that the Note Out (the grayed one) should pass through your hardware and get back to Note In.
4.Click/press the Tune In button and the tuning should start. The leds work as in step 1. The tuning should take about 7 to 15 seconds.
When the tuning is done (blue led is ON). Remove the feedback connection you made in your hardware. Connect that hardware input port to any hardware MIDI-to-CV module or a hardware sequencer. In SoloRack connect the Note Out to the CV in of any VCO (Say S310). Now your hardware can start playing SoloRack’s VCOs. To avoid offsets and confusion, you may want to manually tune the VCO in SoloRack to your chosen middle C frequency (or lowest frequency in +V mode).
Note that the SE06 has to remain connected after tuning (if thats not so obvious). It acts as a converter, actively mapping and fixing pitch inaccuracies as it receives them.
Trouble Shooting
There are a couple of things both in software and hardware that can cause the tuning process to fail, or even succeed but with bad results. Fortunately there is a simple test that you can do to try to diagnose most problems.
– Tune Out LFO test
This test is done without using the SE06 at all. In SoloRack, connect an LFO to the patch point in the SA12 that leads to the pitch CV in of your hardware VCO. Monitor the output of the VCO with a speaker and/or with a spectrum analyzer. The LFO should be able to sweep the VCO frequencies from -4 octaves bellow middle C up to +4 octaves above middle C (or 8 octaves above lowest frequency in +V mode). If that doesn’t happen, if the frequencies that are reached are limited to say +-2 octaves or too course that they sweep a much higher range like +-6 octaves then you may need to manually amplify or attenuate the cv path so that it falls more or less in the right range. Some times you may need to offset the CV path if the range is skewed, say like -5 to +3.
– Tune In LFO test
This test is done without using the SE06 at all. You need a hardware LFO to do this test*. Connect a hardware LFO to the port that leads to the SA11 (or SA01) and connect that to the pitch CV in of a VCO module (like S310) in SoloRack. The rest of this test is exactly the same as the Tune Out LFO test mentioned above. You need to make sure that the sweep range is more or less correct.
– Further Details
The above two tests should eliminate most of the following problems.
1. Make sure that the audio/cv path between your software and hardware is none clipping/limiting at the tuning voltages. The SE06 sends out both negative and positive high voltage while tuning and calibrating. If there is a clipper or limiter in the path, it may limit those voltages. Which will affect the tuning process. Notice that audio interfaces will clip at some point of high voltage no matter what. Eurorack hardware usually can not go above +12v or bellow -12v because of the PSU. The SE06 does not need to go to those high voltages, BUT if your audio path is heavily amplified in hardware or software the voltage may reach the limits and so the tuning will be incorrect.
2. Make sure that the audio/cv path between your software and hardware is not too amplified or too attenuated. This point overlaps with point 1. That is, gain/attenuation will affect clipping and clipping will affect gain/attenuation. The SE06 will always try to automatically compensate for attenuation or amplification in the path by producing higher or lower voltages. But too much of that is troublesome.
3. The latency of your audio interface and hardware has to be less than about 25ms**. If your using a high buffer in your DAW or your audio interface/driver is a bit slow. This might be a problem. But there is an easy fix to that. When doing the tuning, Double click on the Tune Out or Tune In buttons. This will force the SE06 to wait longer for your hardware to respond (longer by another 25ms). If your hardware is even slower than that, try Triple click or Quadruple click. Every click you add will make the tuning latency wait longer.
4. For the Tune In process. Many hardware sequencers and keyboards do not send negative voltages on their pitch output. This means that they won’t play pitches below middle C. An easy fix is to use +V mode.
5. The audio/cv path between your software and hardware has to be more or less linear. Analog hardware can introduce mild none linearities, the SE06 will auto correct that. But if the none linearities are extreme, it wont work well.
*You can use an LFO from SoloRack, but the setup is a bit more involved.
**That is 50ms round trip latency. Going out to hardware then coming back from hardware.
Reviews
There are no reviews yet.